The Sonnet analysis engine, em, is not limited to a purely TEM or Quasi TEM analysis. For a given structure, if a higher order mode (TE or TM) can propagate or an evanescent mode can exist, it will be included in the Sonnet results. These modes are sometimes called waveguide modes, cavity modes, or box modes. If the cavity dimensions are large enough, these modes can resonate, causing spikes (abrupt changes) in your measurements. Since em is a full-wave analysis engine, these resonances will also be present in your Sonnet results. Thus, Sonnet can be used to predict resonances inside rectangular packages and module housings.
In this chapter, we will outline several ways to detect and remove box resonances within the Sonnet simulation. As you will see, this allows you to evaluate a package design early in the design cycle.
We will also discuss how to handle situations where your real circuit is not in a metal box, but the Sonnet simulation shows resonances because of the em analysis box which is not present in the real circuit. In other words, the simulation environment is introducing resonances which are not present in the real circuit.
There are several typical indicators of a box resonance:

The discussion in the rest of this chapter uses a bandpass filter as an example circuit which is suspected to have box resonances, and shows how to determine if these resonances are caused by the box. Various techniques are discussed to remove unwanted box resonances. The bandpass filter and the variations mentioned in this section can be found in the Sonnet example files under the name “box_resonance.” You may access the Sonnet Example Browser by selecting Help - Browse Examples from the menu of any Sonnet tab. For instructions on using the Example Browser, please see File ⇒ Browse Examples. Be aware that this example contains multiple files.
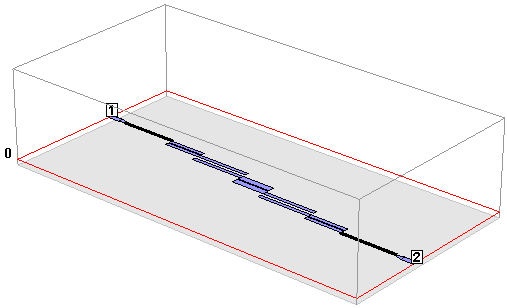
The filter, “Filter_original.son,” is shown below. It is a microstrip edge coupled filter which has been placed in a box which is large enough to support at least one box resonance in the band of interest.
Below is an S21 plot for the example project “Filter_Original”, included in the box resonance example set. Notice that there is a sharp change, or “spike”, in the data at about 12.55 GHz.
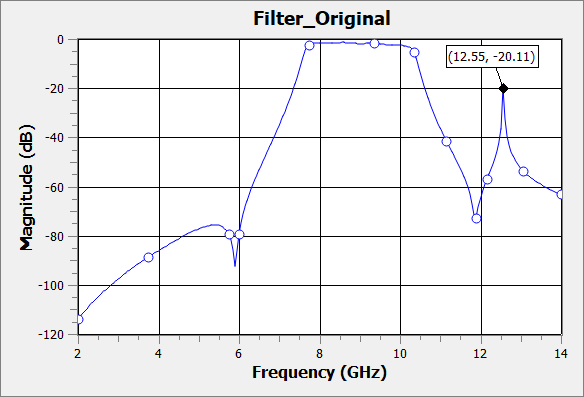
But not every resonance in your response is necessarily a box resonance. For example, it is possible that there could be resonances as part of the filter response. The next section shows the simplest way to check your circuit for box resonances.
The quickest way to understand the box resonance situation within your circuit is to use the Box Resonance Estimator tool before running an analysis. Routinely using this tool before running a simulation can prevent a lot of wasted simulation time. It is an extremely useful tool because it allows you to make modifications to the box size and/or dielectric properties of your circuit and instantly gauge its impact on box resonances. The Estimator can also be used after a simulation is complete to help determine which characteristics of a complex data curve are related to box resonances. The results of the tool are theoretical values based on lossless materials, with the circuit metal removed. For most circuits, this is a good assumption.
To access the Box Resonance Estimator, select Circuit - Estimate Box Resonances from the project editor main menu. The Box Resonances dialog box appears on your display. The result for our example circuit is shown below.
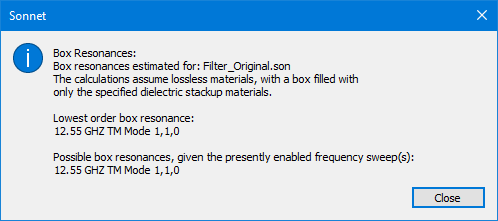
Notice the estimated frequency of the first box resonance is close to the frequency of the resonance in the S-parameter response. Therefore, we can conclude that the cause of the resonance is a strong box resonance which has induced coupling between the input and output ports at the resonant frequency.
The Box Resonance Estimator displays not only the resonant frequencies contained in the simulation frequency range, but also tells the user the particular mode type. It is sophisticated enough to realize that when Symmetry is enabled for a circuit that Even Y modes will not exist. For a complete description of propagation modes, please refer to any classic field theory textbook.
The Box Resonance Estimator is nearly instantaneous because it ignores your circuit metal and only considers the dielectric stackup. In addition, it assumes the following:
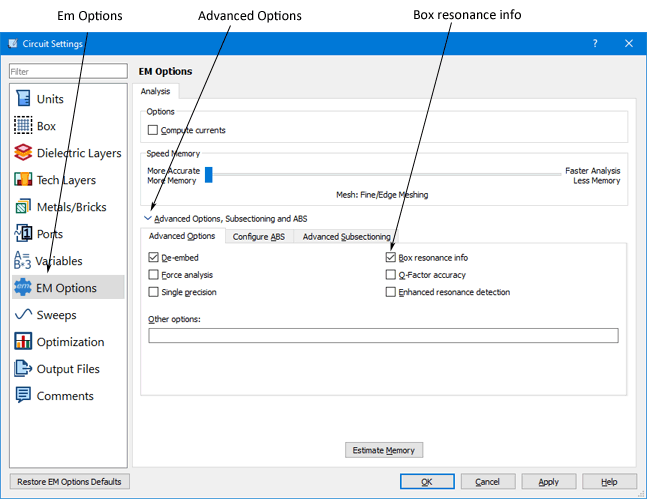
You may use the Box Resonance Info run option to estimate box resonances and output warning messages in the analysis monitor during the simulation. This option is found in the Em Options page in the Circuit Settings dialog box in the project editor. To select this option do the following:
![]() The warning symbol, shown to the left, appears in front of the project in the Job Queue tab when a box resonance is detected. If you click on the Errors/Warning tab below the progress bar, you can view all of the warning messages associated with that particular analysis.
The warning symbol, shown to the left, appears in front of the project in the Job Queue tab when a box resonance is detected. If you click on the Errors/Warning tab below the progress bar, you can view all of the warning messages associated with that particular analysis.
Below is an example of the first type of box resonance warning message from an analysis of the project. When this message appears there is a box resonance detected in the primary structure.
Sonnet Warning EG2680:
Circuit has potential box resonances.
Circuit: primary structure
The calculations assume lossless materials, with a box filled with only the specified dielectric stackup materials.
Lowest order box resonance:
12.55 GHZ TM Mode 1,1,0
Possible box resonances, given the presently enabled frequency sweep(s):
12.55 GHZ TM Mode 1,1,0
Note that the warning message is describing box resonances which appear in the primary structure. The term “primary” refers to the actual structure being analyzed (as opposed to a de-embedding calibration standard). As with the Box Resonance Estimator, the specified dielectric stackup is considered, but the effect of any circuit metalization and loss parameters are not.
Keep in mind that this option invokes the same algorithm as the Box Resonance Estimator. However, it also checks for resonances in the de-embedding calibration standards. If it detects a resonance in one of the calibration standards, a similar warning message to the one above will appear except the “Circuit” line will name the calibration standard. For example, if one of the calibration standards used to de-embed ports on the left box wall is detected, the line will look something like this:
Circuit: left box wall SOC magnetic wall standard
For more information on the calibration standards used for de-embedding, please refer to Calibration Standards.
Sometimes you want to see the response of your circuit in an unshielded environment. In those cases, any resonances caused by the analysis box are considered an artifact of the simulation and do not represent what you would measure. This section shows several methods for removing, attenuating, or moving these artificial resonances out of band.
One way to remove a box resonance is to change the size of the box - making it either larger or smaller - to move the resonant frequency out of band. If the problem occurs in de-embedding, you may be able to change the length of the calibration standard in the project editor to move the box resonance out of the band of interest. See Modifying Calibration Standard Lengths for more information. The Box Resonance Estimator, discussed earlier, can be used to help you find the proper dimensions which will move the resonances out of band.
Another simple way to remove, or at least attenuate, a box resonance is to remove the top or bottom cover. We can create an approximation of this condition by setting one of the covers to “Free Space” (a resistivity of 377 ohms/square). To do this using Sonnet’s project editor, open the Box page of the Circuit Settings dialog box and change the top or bottom cover to “Free Space” by selecting “Free Space” from the Top Metal or Bottom Metal drop list. If you are using an interface to Sonnet, please refer to the instructions for your interface for information on changing the top or bottom box metal.
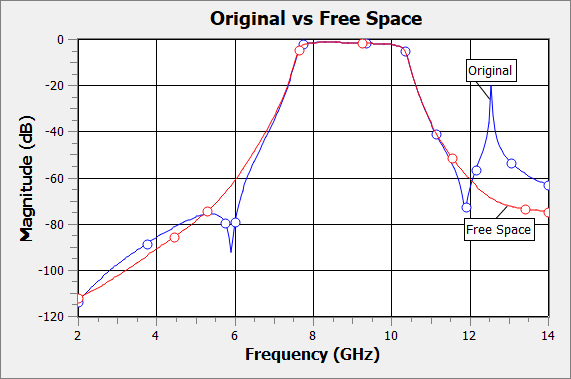
This is an accurate approximation provided the cover is not so close that it interacts with the evanescent fringing fields surrounding the circuit. Typically, the cover should be separated from your circuit by a layer of air that is about a half-wavelength thick. An example of this is shown in the example project, “Filter_FreeSpace.son.” Shown below is a plot of the original filter (blue) and the filter with a free space top cover (magenta). Notice the resonance is no longer present in the circuit with the free space top cover.
As discussed earlier, the Box Resonance Estimator calculates resonances based on lossless covers. Therefore, when your circuit has a free space cover, the Box Resonance Estimator gives a warning message that the reported resonances may be partially or entirely suppressed:
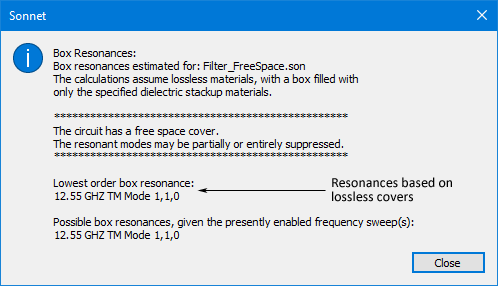
However, notice that below the warning message, the resonances based on lossless covers are still shown. These frequencies should typically be ignored, but are listed so you know where the resonances would have been if the top cover was not set to free space. Thus, you should not use the Estimator to determine if the cover suppressed your box resonances. Instead, you should simulate your circuit, or use the technique described in Using a Probe Circuit for a Quick Analysis.
In Removing artificial box resonances we mentioned some simple techniques for removing resonances that were an artifact of the simulation. But what if you need to put your circuit in a large box that supports box resonances? In this case, if you do not fix the problem, you will have unwanted resonances in your real circuit.
RF and microwave designers have developed many techniques for suppressing unwanted resonances in their package. Sonnet can be an invaluable tool by allowing you to test these techniques and evaluate the impact on box resonances. This section describes just a few of those techniques and how to implement them in Sonnet.
As noted earlier, in Change Box Size, decreasing the box size usually moves the box resonances higher in frequency and the Box Resonance Estimator may be used to determine if a simple change in one of the box dimensions will move the resonance out of band. However, moving the box walls too close to the circuit could change the circuit response. We recommend first changing the box dimensions, then checking the new dimensions with the Box Resonance Estimator. Repeat these two steps until an acceptable box size is found. Then, analyze the circuit with the new dimensions to determine your new response.
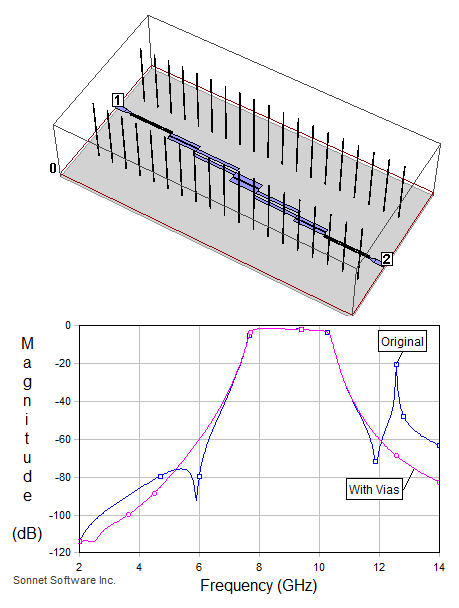
In many cases, ground vias or ground planes will help prevent box resonance modes from forming. In simple terms, they have the effect of dividing the structure into smaller compartments, thus pushing the box resonances higher in frequency. The use of a via fence or CPW type transmission line can help “channelize” the circuit, preventing unwanted coupling between traces and reducing unwanted box resonance effects. All of these features can be included in the Sonnet model.
Shown below is our example filter with vias connected from the top to the bottom of the box (see example project “Filter_Vias.son”). The plot on the bottom shows the response of the original filter (blue curve) and the new response with the vias (magenta curve). Notice that the vias have eliminated the box resonance.
Another approach used by engineers to eliminate box resonances is to add an absorbing material in the housing cavity. The material is normally iron or carbon loaded so it can provide a fairly high magnetic or electric loss tangent. It comes in various forms such as liquid or sheet and is usually placed at a position such that it has a minimal effect on the circuit performance and a large effect on the box resonance. If the material is placed across the entire XY plane, you can easily model its effects in Sonnet by adding a dielectric layer to the stackup. For example, the example file “Filter_Absorber.son” has an absorbing material attached under the top lid of the box. To do this in Sonnet, simply add an extra dielectric layer which has the properties of the absorbing material.
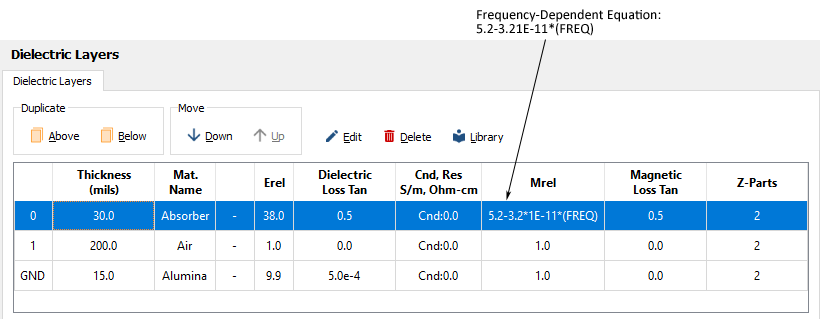
You will need to obtain the properties of the material from the supplier. If the values for the permittivity, dielectric Loss Tangent, permeability, or magnetic loss tangent are a function of frequency, then you will either need to analyze over a narrow band where the values do not vary much, or use a frequency-dependent equation. The example project “Filter_Absorber.son” contains a frequency-dependent equation for Mrel, as illustrated above.
To learn more about using equations to represent dielectric properties, see Equation Syntax.
Shown below is our example filter with the absorber material at the top of the box. The plot shows the response of the original filter (blue curve) and the new response with the absorber (magenta curve). Notice that the absorber has eliminated the box resonance.
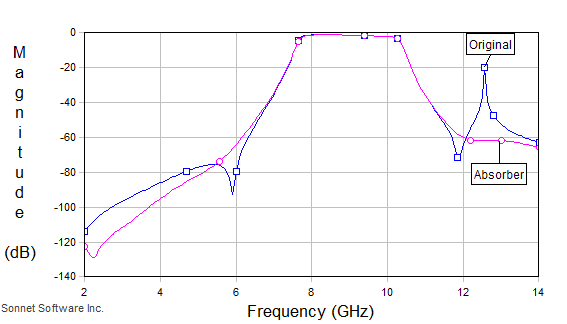
It should also be noted that the Box Resonance Estimator will still predict the box resonance. This is because the Estimator ignores losses in the dielectrics. To determine the effect of the absorber on box resonances, you will need to simulate your circuit, or use the technique described below in Using a Probe Circuit for a Quick Analysis.
The following section describes how to run a quick analysis of your box without having to analyze the real circuit. This can be useful if you wish to quickly try out different techniques for suppressing resonances (either real or artificial). To create a project which does not require a lot of processing time, start with your original circuit, keeping the box size and dielectric properties unchanged, but delete all of the metal. Then set the cell size to be about 1/20 wavelength at your highest frequency.
Once you have deleted your original circuit, you add two small “probes” to excite and detect box resonances. The probes are just small (one or two cells long) shorted lines with a port on one end and a via on the other. The objective is to have metal which has current in the X, Y, and Z directions, so it will excite and detect all possible modes. Add a bend so you are creating both X and Y currents, and use a via to create the Z-directed current. During a resonant situation, the coupling will increase between the two probes.
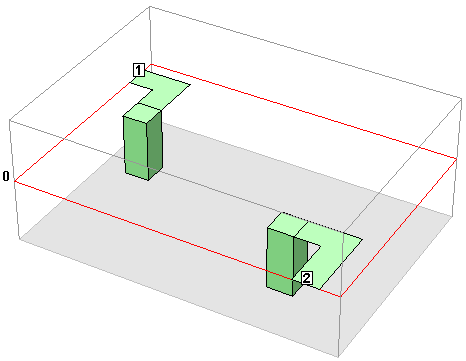
Sweep the frequency in fine steps and look for resonances. We recommend using a linear sweep because an ABS sweep could potentially miss a narrow band resonance. You should run the analysis without de-embedding since de-embedding assumes there are no box resonances which can cause erroneous results. When the box resonates, there should be stronger coupling between your two probes. This can easily be seen by plotting the magnitude of S21.
Since there is no longer any circuit metal, except for the two small probes, any resonances in the results must be box resonances. Now that you have a simple circuit which shows the box resonances, you can try different techniques, such as those mentioned above, to see if any given technique will suppress the box resonance(s).
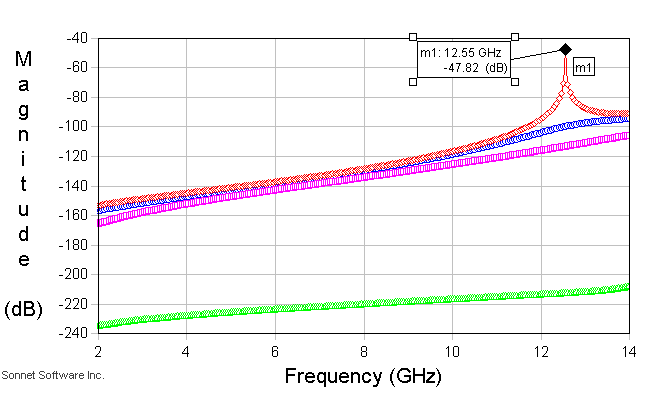
Shown below are the results of using the above technique on our filter example (see example project “Probe_Original.son”). Notice the strong coupling at about 12.55 GHz, the frequency that was predicted to have box resonances:

There are two advantages of this approach:
Shown below are the results of probe versions of all of the techniques discussed above. The original probe circuit is also included for comparison purposes. Notice that all of the techniques suppressed the box resonance.
The above technique assumes that you are investigating a resonance in the primary structure. If you want to investigate a resonance in a calibration standard, you will need to change the box length to be the same length as the calibration standard length. The calibration standard length is reported in the log files and can be accessed by selecting Launch - View Log - Timing Info..
Viewing the fields in the box at the resonant frequency can often give you an intuitive understanding of the resonance, helping you to find an appropriate method to suppress the box resonance. Sonnet allows you to view the tangential electric fields at any XY plane in your box. Below is a picture of the electric fields in an XY plane which is 100 mils from the top of the box. This plot was generated by adding a sense layer to the probe project (see “Probe_Sense.son”) and using a manual scale of a max value of 1.0e-8.
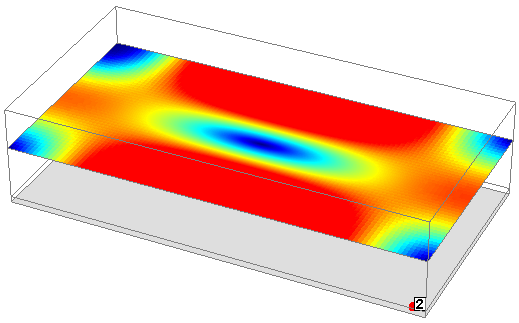
The frequency was chosen to be 12.55 GHz, which is the frequency where the Box Resonance Estimator predicted a TM110 mode box resonance. For further information on using a sense layer to view the tangential electric fields in your circuit, see Viewing Tangential Electric Fields.
Indications that you may have a box resonance include:
The techniques discussed in this chapter can be used to first determine if you have a box resonance, and then to remove the box resonance from either your simulation or your real measurement, or both.