
Port Properties dialog box
Selecting Modify => Port Properties opens the Port Properties dialog box (unless the port is part of a component, in which case the Component Port Properties dialog box is opened). The Port Properties dialog box allows you to modify the number, type and impedance associated with the selected port(s) as well as specifying the reference plane or calibration standard length for the port. It also allows you to set properties for co-calibrated internal ports. This command is only enabled when at least one port is selected in your circuit.
Port Number: Renumber the port by entering a new value in the Port Number text box. Ports in your circuit must be numbered sequentially. For more detailed information about port numbering, please refer to the "Special Port Numbering" section in the "Ports" chapter of the Sonnet User's Guide.
Type: Select the port type from a drop list consisting of Standard, Autognd and Co-calibrated. The appearance of the dialog box changes depending on which type of port is selected.
Calibration Group Section
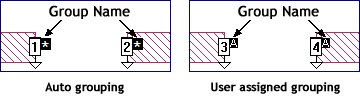
This section of the dialog box only appears when you select Co-calibrated as your port type. By default, a co-calibrated port is automatically assigned to a calibration group, so "Auto" appears in the Name field. You may manually assign a co-calibrated port to a calibration group by selecting the calibration group from the name drop list. All existing manual calibration groups are listed along with a choice to set up a new calibration group. The group name appears on the port symbol in the project editor view. For the default of auto grouping, the port symbol displays a "*" and for a manually setup calibration group, the letter identifying the calibration group is displayed, as shown below.
Calibration Group Name: By default, co-calibrated ports are automatically grouped by the software, so that Auto appears in the Group Name field. However, if you wish to manually create a calibration group, you may assign a Group Name. The Group Name is a letter designation provided automatically by the project editor; it is not possible for you to use a custom name. If you wish to add the selected port to an existing group, select that group from the drop list. If you wish to create a new manual calibration group, select the "New" entry in the drop list which is always followed by the name that will be used for the new group.
Properties: To change the properties for the selected co-calibrated ports, click on the Properties button in the Calibration Group section of the dialog box to open the Calibration Group Properties dialog box. When you open the Calibration Group properties dialog box an Assistant is displayed that will help you to determine the properties which you wish to use for the port. Note that if you change the Calibration Group properties of a co-calibrated port, it can only be grouped with other co-calibrated ports which share the same calibration group properties. Any changes of the Calibration Group properties made to a co-calibrated port which is assigned to a manually created calibration group apply to all the co-calibrated ports in that group, regardless of whether they are presently selected.
Reference Plane Section
Em has an automatic de-embedding capability. When invoked, em negates the port discontinuity and a desired length of transmission line, moving the reference plane into the interior of the box. The reference planes used for de-embedding are set in this dialog box as well as the calibration length used for de-embedding.
If the port is either auto-grounded or co-calibrated, you may enter a reference plane length and/or a calibration standard length. If the port is a standard box wall, you may chose between three different methods as described below.
Linked Radio Button: Selecting this radio button links the end of the reference plane to a point on a polygon. As that point on the polygon moves, as part of a reshape or a new value for a parameter, the length of the reference plane also changes. After selecting this radio button, you click on Mouse button, then click on the point in your circuit to which you wish to link the reference plane. Once you have selected the point, the length of the reference plane is displayed in the dialog box.
Fixed Radio Button: Selecting this radio button allows you to assign a fixed length to the reference plane. After selecting this radio button, you may set the length one of two ways. You can enter a length in the text entry box which was enabled when you selected this option. Alternately, you may click on the Mouse button, then click at the place in your circuit to which you wish to the reference plane to extend.
None Radio Button: Selecting this radio button means that no reference plane is used at all. Only the port discontinuity is de-embedded. If you wish to specify a calibration length for this port click on the Used fixed cal. length checkbox and enter the calibration length in the text entry box that is enabled by selecting the checkbox.
The project editor may change the reference plane slightly so that it is aligned with the edge of a cell. The actual position is indicated with a short vertical line at the actual reference plane location. Linked reference planes are indicated by the outline of an arrow while fixed length reference planes are indicated by solid arrows.
To remove a reference plane, click on the None radio button and set the Used fixed cal. length checkbox to off.
![]() For a detailed
discussion of de-embedding and the use of reference planes and calibration
standards, please refer to the "De-embedding" chapter in Sonnet's
User's Guide, available in PDF format through the Sonnet task bar.
For a detailed
discussion of de-embedding and the use of reference planes and calibration
standards, please refer to the "De-embedding" chapter in Sonnet's
User's Guide, available in PDF format through the Sonnet task bar.
Advanced Options Section
The Length type and orientation of the reference plane are displayed in the Advanced Options section of this dialog box. For Autogrounded ports and co-calibrated ports the type and orientation are automatically determined by the software and displayed here. For box wall ports, you may click on the Change button to change these settings. When you click on the Change button the Reference Plane Options dialog box is opened. For an explanation of the type and orientation,see the Reference Plane Options dialog box.
Impedance
Enter the four impedance values in the text entry boxes: Resistance (in ohms), Reactance (in ohms), Inductance (in nanohenries), and Capacitance (in picofarads). Note that all the co-calibrated ports in a Calibration group must have the same impedance. You may not change the normalizing impedance for Ports numbered zero (0). The entries are disabled whenever the port number is zero.

![]() For a detailed
explanation of ports and how they are modeled, please refer to the ''Ports''
chapter in the Sonnet User's Guide.
For a detailed
explanation of ports and how they are modeled, please refer to the ''Ports''
chapter in the Sonnet User's Guide.
NOTE: If multiple objects are selected which have different parameters, the entry ''Mixed'' appears in the pertinent text entry box. Changes made in the Properties dialog boxes will affect the parameters of all selected polygons or ports.