The next example demonstrates a netlist project analysis which invokes a geometry project analysis in conjunction with using previously generated data.
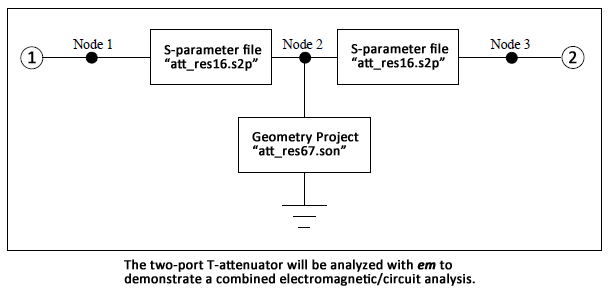
To demonstrate a netlist with a geometry project, the two-port T-attenuator shown below will be analyzed.

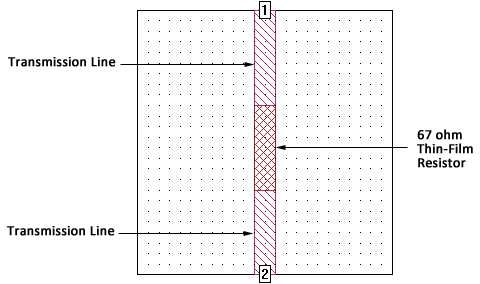
Pictured below is the geometry project “att_res67.son”, which is a 67 ohm thin-film resistor. This project is read by em and analyzed during the netlist analysis. The results of the project analysis are used to compute the results for the netlist.

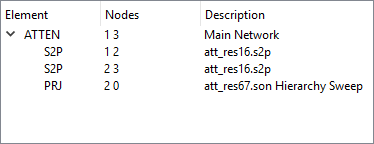
The netlist project, att_combine.son is shown below. The project att_combine.son is available as part of the Att example for Netlist Project Analysis.

The primary distinction between the netlist shown above and the previous netlist is that this netlist contains an instruction to perform a project analysis. The PRJ keyword instructs em to run an electromagnetic analysis on the project “att_res67.son” using the analysis controls from the netlist. The analysis control use is indicated by “Hierarchy Sweep” in the PRJ statement. When the EM Option is set to “Hierarchy Sweep”, em automatically analyzes the subproject at the same frequency sweep and run options as the netlist.
During the analysis, em performs the following steps:
 Before executing a PRJ statement, em checks for the existence of data at the specified control frequencies. If the data already exists, and the project has not changed since the data was generated, em does not execute an electromagnetic analysis, but uses the available data.
The listing below shows the output of the netlist analysis, as it appears in the analysis monitor, which contains the overall set of S-parameters for the T-attenuator.
